Painting A Driveway: What You Need
The driveway is very often a part of the home which is overlooked when it comes to renovation or restoration jobs but it is actually a good idea to paint your
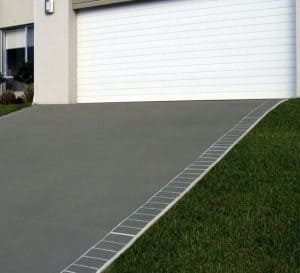
Painting a driveway can add substantial value to your home
driveway every couple years or so for other reasons besides appearance. Painting the driveway can help fill in cracks and prevent concrete from chipping which in turn keeps your driveway in good condition for longer. It also can help to seal the concrete which is important as the driveway is always exposed to varying changes in temperature and weather.
Painting the driveway is a task that does require the right weather conditions as it is not something you want to do in windy weather or if there is rain in the forecast. You should plan to paint your driveway during the warmer season when you can expect several days of sunny weather. It is also a good idea to have all the items that you will need to for the job ready to go ahead of time so that the process is as smooth as possible. Here is a basic list of things you will need for this project:
– Concrete cleaner or degreaser
– Sweeper (or pressure washer for very soiled driveways)
– Concrete repair caulk
– Putty knife
– Masking/ painters tape
– Concrete paint
– Paint sprayer
– Paint brush
– Stencil (optional)
By planning accordingly and taking the necessary preparatory steps to ensure the surface is clean and ready to be painted, you can then follow the step by step instructions below to enjoy a newly painted and improved driveway for your home in no time.
Step 1: Prepping the driveway for painting
As aforementioned, the driveway, like any other surface to be painted, needs to be prepped to ensure the paint will go on smoothly and so that the driveway can seal properly as well. Firstly remove all debris from the driveway by using either a pressure washer and/ or a leaf blower. If there are oil or grease stains on the concrete you may need to use a degreaser or other kind of cement cleaner. A good one to try is Krud Kutter Clear Original Concentrated Cleaner Degreaser/Stain Remover. This commercial strength product is fantastic at removing a huge variety of stains effectively. It is also safe to use on many types of surfaces and one of the best parts about it is that it has no odor.
Step 2: Repair the driveway Surface
• After thoroughly cleaning the driveway you need to inspect the surface for any cracks and chips. This is necessary so as to provide a smooth and even surface for painting the concrete. Inspect the concrete and remove any loose debris, gravel, and dust, from the cracks and chipped parts of the surface. If there are cracks or chipped areas with a diameter greater than 1/4 inch, fill the cracks and chips with a concrete repair caulk.
• Use a putty knife to press the caulk mixture into the cracks and chips and smooth over so that it is even with the rest of the surface. If there are very big cracks or large areas that have broken away, instead of using caulk, use premixed mortar to repair. A very good concrete repair product that takes the place of both a standard caulk and mortar mix is made by 3M and is called 3M Concrete Repair Self-Leveling Gray. This is a very easy to use product which doesn’t require any mixing and is distributed evenly from dual nozzles. It is self setting and it adheres and sets within five minutes of application. It will harden at any depth without shrinking or cracking and is a product that 3M says will outlast any other type of concrete repair product. Allow the areas to dry completely and then re-check to ensure that the surface is even and smooth. Reapply if needed and sand the repaired area to smooth out any bumps or ridges.
Step 3: Tape Off Your Driveway
Before actually starting the painting portion of the project, be sure to cover the areas which you do not want to be painted. This would include the walls, the garage door, the edgings of grass, the curb, etc. An easy way to do this is to simply use masking tape or painters tape to cover those areas. A nice choice is Frog Tape, which we have recommended before in our favorite painter’s tape article. It is designed with s strong rubber adhesive, can withstand hot temperatures and is especially good for adhering to irregular surfaces.
Step 4: Paint the Driveway
• Now you are finally ready to paint your driveway. Your choice of paint is probably the most important decision you will need to make for this project. There are
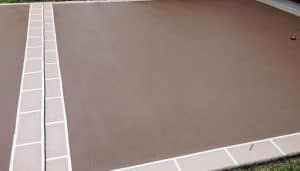
Taping a driveway must be done very carefully
many different types of paint out there but some are more suitable for concrete than others. A popular and highly rated paint for exteriors is Rust-Oleum Stops Rust Protective Enamel. It is the number one rust-preventive paint available on the market, comes in a wide array of colors and dries quickly. It is durable and can withstand the elements and is designed for easy application. It is also fairly inexpensive and can be used on other surfaces as well.
• There are most likely some parts of the driveway which are a little harder to get to or that have a little more detail. In order to paint these areas neatly you can start with a process called “cutting in” which basically is to use a paintbrush to neatly paint the edges or any areas that more detailed as these parts may require a little more precision. After cutting in you can move onto the main step of painting the rest of the driveway.
• The simplest and most efficient method of painting a driveway is to use a paint sprayer instead of the traditional use of a paint brush. Using a paint sprayer not only allows you to achieve a more even and consistent paint job but also is much quicker and more user-friendly. I would recommend using a sprayer such as a Graco X5 or other similar sprayer as you want a full coat with each spray. This sprayer is designed to speed up the painting process and is said to be up to three times faster than using a brush. It is also very lightweight so is ideal for carrying and very easy to store plus it takes only five minutes to set up and takes only ten minutes to clean up.
• While using the paint sprayer to coat your driveway, be sure to work in a manner that provides an even coverage. Start at the top of the driveway and move downwards so that you do not paint yourself into a corner. Once done, allow the driveway to dry for at least 16 hours and then give the entire surface another coat of paint using the paint sprayer. The final coat of paint should be given at least seven full days to cure before using the driveway to walk and drive on.
Completing Your Paint Job