Anyone that has ever painted a ceiling before knows that there are tricks and challenges that are different from painting other portions of the home. If you have ever wondered how to paint a ceiling with a paint sprayer, we can give you an expert step by step tutorial. Let’s take a look into why a ceiling can be different from other types of painting projects. The post below will help you paint your ceiling with tips, tricks and tidbits.
Tools for Painting Your Ceiling
Painting a ceiling with a paint sprayer will cut off a considerable amount of time to the overall process of painting. With that being said, it is still wise to prepare for everything you need and have an extra roller or two for the spots that be hard to reach. Here are the tools needs for painting your ceiling.
- Paint Sprayer: Well if we were going to choose a roller, there would be several more tools to add to this list but the paint sprayer cuts down the
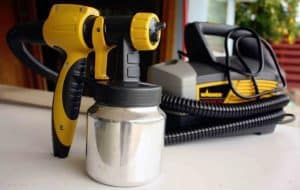
Wagner Control Spray Max HVLP
need for these. When painting indoors I would choose a HVLP paint sprayer such as a Wagner Control Max HVLP Painter or another similar model. Graco also makes great sprayers that I highly recommend. If you are just painting rooms you can find a quality painter for about $150 or less.
Check out more reviews on the Wagner Control Spray Max
- Rags or Sponge: A rag or sponge is always good to have around when you are painting. You never know when you are going to need to quickly wipe paint away from a place that doesn’t need to be painted.
- Step Ladder: Depending on how tall your ceilings are and how tall you are you probably will need a small step ladder of some kind. Because a paint sprayer does the majority of the work, if you do not need this, you will cut your time down considerably.
- Lighting: We recommend painting ceilings at night because of the reflections and other problems that may happen during the day. Typically when I paint a ceiling, I will use a tall lamp and move it around the room depending where I am painting. I can see the blemishes and imperfections better this way.
- Painter’s Tape: Perhaps the most important tool in a DIY painter’s arsenal would be the trusty painters tape. Painter’s tape is a valuable tool to have when painting a ceiling as it lets you tape off any areas that you do not want painted.
- Painter’s Plastic: Painters plastic goes hand in hand with painter’s tape. As a good rule of thumb you will want enough painter’s plastic to cover the floor twice and than a little extra just in case. Some people use a tarp on the floor, which can be used whenever, but as a traveling painter I like to use painter’s plastic so that I can throw it away before having to have the paint dry.
- Eye Protection: Many of people who have painted a ceiling without eye protection have immediately regretted this decision due to dripping paint. While paint sprayers generally don’t drip like a traditional roller, we advise any DIY person to have eye protection and maybe even a ventilator when painting a ceiling.
What Type of Paint Should I Use to Paint my Ceiling?
When trying to find the best type of paint for ceilings there are many factors to look at before the painting actually begins. Here is what to look for before decided on your colors.
What type of material is my ceiling?
Finding out what type of ceiling that you have first will make a big
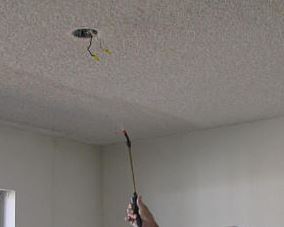
Painting a popcorn ceiling can be different than a flat ceiling
difference on choosing what paint you need for your ceiling. While drywall is usually what most ceilings are made from, there are several others that you may have to account for including stucco, plaster, wood and a few others. Write down what type of surface you will be painting before moving forward with any paint selection.
How hard is it to paint a ceiling ?
Just like any other DIY task there are hard ways and easy ways to do it. If you need some tips, check out this post on painting a ceiling the easy way.
What kind of ceiling do I have?
Popcorn ceilings are very popular for older homes, while newer homes tend to have more traditional flat ceilings. If you are painting a popcorn ceiling, I recommend using a flat latex paint as this sprays the best onto popcorn ceilings.
What color should I paint my ceiling?
Depending on what you want from your room will play a huge role on what type of colors that you should use to paint the ceiling. As a rule of thumb white and light colors brightens up a room and makes it feel larger, while dark colors make it feel cozy and intimate.
How to Paint a Ceiling with a Paint Sprayer like a Pro
Now that we have covered the steps on what materials that you need and what colors to pick for your ceiling project it is time to tackle the job. For those who have ever done a painting project, the picking of paint, colors and prepping to paint are the hard part, the actual process of painting is much easier, especially when you are using a paint sprayer to paint your ceiling. Here are the steps.
- Prep your room: Prepping a ceiling to paint usually is more exhaustive
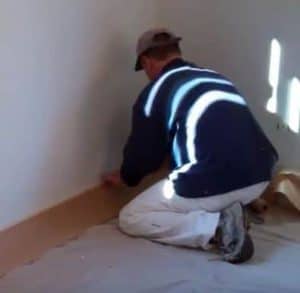
Prepping to paint is often the longest part of the job
than prepping a wall to be painted. Because you are dealing with dripping paint and painting over your head you must prep your floor for paint. A good rule of thumb is to add painter’s tape all around the edges of the floor and add your plastic on top of the edges a few feet in on all sides. Next, you can cover all of that with more painter’s plastic or use a tarp.
Besides the floor you will also want to prep the walls around the area that you will be spraying. Depending on how little over spray you have you may need to tape and put plastic a few feet down on each wall. I recommend taping around the upper wall and allowing at least 16-20 inches of plastic hanging down from the wall to avoid spraying any wall when getting the corners.
- Primer or Ceiling Paint with Primer: One of the most popular paint choices for those who are doing home DIY projects is to choose a ceiling paint with a primer that is already added. If you do this will cut down on the need for a primer and a few steps in your process. For those choosing to use a primer, it is simply just applying your primer with your paint sprayer. Like all paint jobs I recommend getting the edges first in a square formation and then filling in the middle with one coat on way and one the other.
- Dry, Clean and Repeat: After you have used the primer it is time to add the paint to the paint sprayer and begin the process of painting your ceiling with a paint sprayer. Depending on how quick you primer dries will be a big factor in the next step. We recommend looking on the back of your particular primer and using those as a guide.
Clean: Once you have used your primer it will be time to clean your paint sprayer. Following the directions that come with your particular paint sprayer is the best rule when cleaning a paint sprayer as some sprayers are built differently than others.
Repeat: Following the same process as you did with the priming you can now use your paint gun to paint your ceiling. Remember when using a paint sprayer on a ceiling that you use consistent and steady strokes and to wear eye protection to avoid spray dripping into your eyes.
- Apply a Second Coat: While most ceilings can be considered done with a primer and a spraying, many people like to apply another coat of paint after the first coat dries. It is wise to use a flashlight or your lamp to walk around your room and look for any missed spots or imperfections. Here is a guide on how much paint you should use depending on your situation.
Final Words on How to Paint Your Ceiling
Painting a ceiling with a paint sprayer can be done very easily once the right tools and paints are picked out. Using the guide above, you can find great tips on how to paint a ceiling with a paint sprayer the right way. One important thing to remember before moving forward is to know what type of ceiling you are painting and know the materials necessary to get the job done right, the painting part is the easy part.