As a professional painter and owner of a painting website one thing I really enjoy it people who WANT to learn how to paint the right way. I often get asked how to paint kitchen cabinets by some of my co-workers, but when I go into detail, they think it is too hard.
Using a paint sprayer can be an awesome tool to upgrade your house with a little know how. Below I would like to go through the steps I would take when doing a DIY Cabinet spray painting job.
DIY Cabinet Spray Painting Made Easy
The world and the time have come to such that even the hardest of the things seem to be achievable only through some brainstorming and a fair knowledge or know-how. Thus, when you are planning on painting your cabinet, you can very well get your hands dirty and customize your design without any help from an outsider.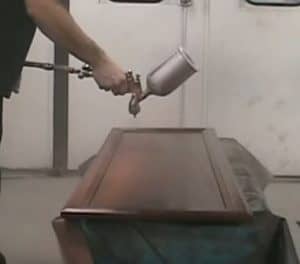
How? Pre-planning, endurance, few tools and of course a good paint gun and stencils, will always do the trick. Let go of all the dripping paints and the paint brush so dirty that it is a nuisance, and dabble with the paint spray can because nothing can get any easier than that.
Prepare
Preparation is the key to everything; and when it comes to spray painting the cabinet, it is essential. For instance, if you are unaware of what designs, color, pattern or even where and how you would want the cabinet to get painted, you will end up with the result that is unsatisfactory. It is best to know the ins and outs, like what is the brand of paint for kitchen cabinets, what type of paint gun should I use and other tidbits.
Those being said have a foresight and try to imagine the kind of cabinet your desire. Only warning, spray paint tends to get everywhere, if used improperly. Thus, supplies like tapes, stencils and even protective measures to keep the spray paint from staining every possible thing around, are important.
Start with the simple things
Things required:
- Masking Tape
- Rosin Paper
- Plastic Sheets
- Old Newspaper for the floor
- Work Table
To even paint the smallest of the areas, one must clear anything from the surrounding that might get affected by the paint. Thus, for cabinet painting, it is important to take away the utensils, move the furniture, paint proof the areas, which must not be painted. Even the floors should be covered and taped so that there is no residue of paint sticking to anything that is not needed. And most importantly, you must set up a worktable, with all the major things like the spray paint and other devices to avoid significant movement on your part, which might be a distraction.
Detach the Replaceable
Things Required:
- Power Drill
- Screw Driver
- Protective mask or glasses
Detach the removable body parts of the cabinet, like the doors and the shelves. Unscrew all the screws with either a power drill or even a screwdriver and just keep a tab of these things, by numbering them and keeping it on the workstation. Wearing a protective mask or glasses are essential because you might get splinters on your face, or worse, eyes and this will never be helpful for proper functioning. Keep all the parts aside, because each of them must be spray painted, but that comes on a much later part.
Clean, Clean, Clean
Things Required:
- Wash Cloth
- Cleaner
- Abrasive Pad
- Liquid De-glosser
- Safety gear
For paint to stick properly to the body of the cabinet and the doors, it is important that all the gloss, dirt and even the grease is removed from the surface. Thus, first try to dry clean the surface with some dry piece of cloth and remove the dirt that can be taken out, although this is an extra step, and then follow it up with an abrasive pad dipped in liquid de-glosser. Ventilation in the room is crucial. Dip the abrasive pad in the liquid and swiftly rub off the dirt. Before the liquid evaporates try to clean the surface with another abrasive pad and you will have a prepped cabinet and its parts.
Prep The Surface One Last Time
Things Required:
- Auto body filler(optional)
- Sand Paper
- Vacuum Cleaner
- Tack Cloth
If you intend on relocating the hardware and change the setting of the cabinet, you must fill up the holes of the screws with some auto body filler. It is important to use a little more than what is required to fill the hole completely because of the filler shrinks, once dried, remove the excess. Now, use sandpaper on the entire surface of the cabinet and just prepare the surface for what is to happen, next. Finally, remove all the dirt with a vacuum cleaner and then use a tack cloth, for the further precautionary measure.
Prime Away To Glory
Things Required
- Primer
- Latex Caulk
Anybody who intends on putting on paint on any surface will know the importance of primer, so put on the primer and let the surface dry for at least a day. Once the primer is dried completely, use the latex caulk to bridge the gaps between any surfaces or remove any bump and make it a smooth surface for you to work properly. With spray paint, one bumpy surface can turn into a hassle, because the color would provide a proper finish. But make sure to use sand paper again, to smoothen the area.
Spray paint, because what else is fun?
Things required:
- Spray paint color of your choice
- Stencils (optional)
- Knobs (your choice)
- Decorations (if any)
Let your imagination go wild, from now on. But to stick to a certain pattern, it is important to make light and gentle straight strokes of paint from the spray can. The general direction of applying the paint is to move back and forth first, and then move up and down. Now, keep the can at least 8 or even 10 inches away from the surface for smooth application. Now, once the spray paint has been applied properly, wait for the first coat to dry, before you apply the next one.
Wait for the paint to have completely dried, even if it takes days, wait until you start working on your DIY projects. In the meanwhile you can paint, prep and even make the doors, the handles, the shelves of the cabinet and this way, you will have all the parts to assemble, ready by the time the paint dries.
Now, from here, put stencils if you want to, paint various shades, bring nuance to your imagination. If you are replacing the knobs on the cabinet, make sure that you have made a proper structure which will hold it in place and you will have a result that is workshop level beautiful.
Pro Tip:
- While using the tack cloth, open the entire piece of cloth and then crumple it in one tight mush. This will provide more space for the dirt to stick on to. Because if there is dirt, the painting will be uneven, and since, there is no paint brush on which the residue might get stuck to, while painting, chances are it will leave an uneven stain of the surface.
- Clean the wooden surface, no matter what it appears to be. Even if you clean it every single day, there is supposed to be some residue grease, and this will be a hindrance in properly painting the cabinet. Thus, remove every possible speck of dirt and grease.
- Waiting is virtue when it comes for the paint to dry. Because this painting is done with the help of a spray paint, chances are that the strokes might seem unprofessionally made, if you do not give the paint to dry completely.
- The more the distance between the can and the surface the sleek the application of paint will be. Or else there will be splatters of paint and all of that dripping down, which might show up once the paint dries.
- Use 100-grit sandpaper, while you try to sand and prep the surface. This type proves to be the most efficient and is the craftsmen’s handy tool. But after you have put latex caulk on the surface, you might want to switch to 220-grit paper for a smoother finish. Always vacuum and use tack, once you have used the sandpaper, for previously mentioned reasons.